Yosemite Documentation
Looking to set up your site using Yosemite? This document will walk you through the process.
#Installation
We have written a very detailed guide on how to download and install a WordPress theme, please follow the instruction in that article.
IMPORTANT:
In order to make the theme works properly, you need to install the Jetpack plugin. Simply go to the Dashboard → Plugins → Add New. The plugin will appear in the list below, click Install Now button to install it.
After activating Jetpack, you need to connect to WordPress.com to use it (it requires you to create an account on wordpress.com - which is free). If you don't want to create an account on wordpress.com, you can enable the Jetpack development mode.
#Header Setup
#Custom Logo
The theme displays site title and tagline by default, as shown on the demo. You can also display a custom logo, and optionally hide the site title and tagline.
To add a logo, go to Customize → Site Identity and upload a logo.
![]()
#Navigation
The main navigation menu appears at the top left of every page on your website. On tablet and mobile devices, it will be hidden behind a toggle button. To set it up, create a new custom menu via Customize → Menus and assign it to the Header location.
#Social Links Menu
The social links menu displayed at the top right of your website. To add social links, create another menu and add links to your social network profiles. Then assign it to the Social Menu location.
Note that these social links will display in the Footer as well.
Linking to any of the following sites will automatically display its icon in your menu:
- 500px
- Amazon
- Angel.co
- Bandcamp
- Behance
- Bitbucket
- Codepen
- Del.icio.us
- Deviantart
- Digg
- Dribbble
- Dropbox
- Etsy
- Flickr
- Foursquare
- Github
- Gitlab
- Google+
- Gotinder
- Gratipay
- Houzz
- Imdb
- Jsfiddle
- Last.fm
- Leanpub
- Medium
- Meetup
- Mozilla
- Ok.ru
- Producthunt
- Qqchat.qq
- Quora
- Ravelry
- Scribd
- Skype
- Slack
- Slideshare
- Snapchat
- Soundcloud
- Spotify
- Stackexchange
- Stackoverflow
- Steamcommunity
- Steampowered
- Stumbleupon
- Telegram
- Tencent
- Tripadvisor
- Tumblr
- Viadeo
- Vimeo
- Vine.co
- Vk
- Weixin.qq
- WordPress
- Wikipedia
- Ycombinator
- Yelp
- Youtube
#Featured Content Slider
Yosemite allows you to set up to 10 posts as "featured". They'll be displayed in a slider at the top of your front page.
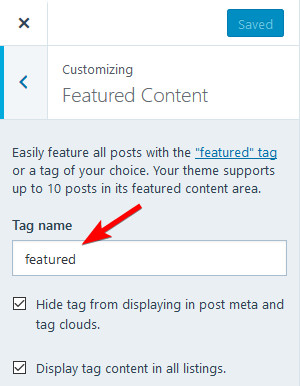
To set up the Featured Content slider, you need to publish some posts with Featured Images and give them all the same Tag, like "featured":

Next, go to Customize → Featured Content, and enter the tag you used in the previous step in the "Tag name" field. Click Save & Publish.
#Featured Image
When editing a post in Yosemite, add a featured image to each post. The featured image is displayed above the post excerpt on the homepage.

#Post Formats
Yosemite supports the following post formats:
- Standard
- Audio -- the audio player will display in the place of the featured image
- Video -- the video player will display in the place of the featured image
- Quote -- only the quote content is displayed
To specify a post format for a post, select it from the list in the "Post Format" panel on the right side of the post editor:

#Widgets
Yosemite works nicely with all the available widgets. Simply go to Customize → Widgets → Sidebar and add the widgets you like.
Beyond the default widgets, we also create a custom Yosemite: Recent Posts widget that displays recent posts with thumbnail. Simply select it from the list of available widgets as below:
#Footer
The footer displays the social links menu and credits. If you already assigned a social links menu earlier, you'll see them here.
#Instagram Integration
Yosemite displays Instagram images in 2 places: sidebar and footer.
To display Instagram images, please install the Smash Balloon Social Photo Feed and connect to your Instagram account.
For the sidebar, go to Instagram Feeds → All Feeds and click the + Add New button to create a new feed. In the feed settings, set the following parameters:
- Feed layout: set Number of Posts to 9, and columns to 3 for both desktops and mobiles.
- Disable header, load more button and follow button.

After that, copy the feed shortcode, and go to Appearance→ Widgets, add an Instagram Feed widget to the Sidebar and paste the shortcode into the widget content:

For the footer, create another feed, but adjust the settings as follows:
- Feed layout: set the padding to 0, number of posts to 8 for both desktop and mobile, columns to 8, 4, 2 for desktop, tablet, mobile correspondingly
- Disable header, load more button and follow button.

Then copy the feed shortcode, and go to Appearance→ Widgets, add an Instagram Feed widget to the Footer Instagram and paste the shortcode into the widget content. Don't enter anything for the widget title:

#Customization
We recommend using a child theme to customize the theme. Here is the guide how to do that.
In addition, you can customize the theme CSS by going to Customize → Additional CSS.
If you want to customize the fonts, we have a powerful and easy-to-use plugin that can help you do that.
We hope you live Yosemite. If you have any question, please send us a support ticket. Happy blogging!