EightyDays Documentation
Thank you for using 80Days theme for your website. We hope you like it! In this documentation, we will show you how to install and setup the basic demo for your website. This takes you only 5 minutes to have the website ready!
#Installation
We have written a very detailed guide on how to download and install a WordPress theme, please follow the instruction in that article.
In order to make the theme works properly, you need to install the Jetpack plugin. Simply go to the Dashboard, then click on Plugins → Add New, type the plugin name in the search box and press Enter. The plugin will appear in the list below, click Install Now button to install it.
After activating Jetpack, you need to connect to WordPress.com to use it (it requires you to create an account on wordpress.com - which is free). If you don't want to create an account on wordpress.com, you can enable the Jetpack development mode.
#Header Setup
#Custom Logo
The theme displays site title and tagline by default, as shown on the demo. You can also display a custom logo, and optionally hide the site title and tagline.
To add a logo, go to Customize → Site Identity and upload a logo.
![]()
#Top bar menu on the left:
The top bar menu appears at the top left of every page on your website. On tablet and mobile devices, it will be hidden. To set it up, create a new custom menu via Customize → Menus and assign it to the Header Top location.
#Social Links Menu
The social links menu displayed at the top right of your website. To add social links, create another menu and add links to your social network profiles. Then assign it to the Social Menu location.
Note that these social icons will display in the About widget and Footer.
#Navigation
The main navigation menu appears below your logo. On tablet and mobile devices, it will be hidden behind a toggle button. To set it up, create a new custom menu via Customize → Menus and assign it to the Header Bottom location.
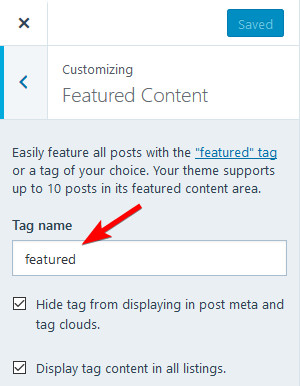
#Featured Content
EightyDays allows you to set up to 3 posts as "featured". They'll be displayed in a tiled gallery at the top of your front page.
To set up the Featured Content slider, you need to publish some posts with Featured Images and give them all the same Tag, like "featured".
Next, go to Customize → Featured Content, and enter the tag you used in the previous step in the "Tag name" field. Click Save & Publish.
#Widgets
EightyDays works with default WordPress widgets. We also create 2 custom widgets that you can use to display beautiful content in the sidebar like our demo:
- About widget
- Recent Posts widget
We also recommend enabling Subscription module in the Jetpack plugin. This module has a subscription form widget that you can add to the sidebar.
#Footer
The footer displays the social links menu and credits. If you already assigned a social links menu earlier, you'll see them here.
#Instagram Integration
EightyDays displays Instagram images in 2 places: sidebar and footer.
To display Instagram images, please install the Smash Balloon Social Photo Feed and connect to your Instagram account.
For the sidebar, go to Instagram Feeds → All Feeds and click the + Add New button to create a new feed. In the feed settings, set the following parameters:
- Feed layout: set Number of Posts to 9, and columns to 3 for both desktops and mobiles.
- Disable header, load more button and follow button.

After that, copy the feed shortcode, and go to Appearance→ Widgets, add an Instagram Feed widget to the Sidebar and paste the shortcode into the widget content:

For the footer, create another feed, but adjust the settings as follows:
- Feed layout: set the padding to 0, number of posts to 8 for both desktop and mobile, columns to 8, 4, 2 for desktop, tablet, mobile correspondingly
- Disable header, load more button and follow button.

Then copy the feed shortcode, and go to Appearance→ Widgets, add an Instagram Feed widget to the Footer Instagram and paste the shortcode into the widget content. Don't enter anything for the widget title:

#Customization
We recommend using a child theme to customize the theme. Here is the guide how to do that.
In addition, you can customize the theme CSS by going to Customize → Additional CSS.
If you want to customize the fonts, we have a powerful and easy-to-use plugin that can help you do that.
We hope you live EightyDays. If you have any question, please send us a support ticket. Happy blogging!
#FAQ
1. How to remove the featured image on single post?
The featured image on single post is removed in the latest version of EightyDays theme. If you haven't updated, please update it now.
If you're using an older version, please go to Customizer → Additional CSS and enter the following CSS:
.single .entry-media { display: none; }